Pipelines
Create a new pipeline
To create a new pipeline using Kronos, you simply need to follow two steps:
- generate a configuration file using make_config command.
- configure the pipeline by customizing the resulting configuration file, i.e. pass proper values to the attributes in the run subsection and set the connections.
Note
If you need a component that does not already exist, then you need to make the component first.
Examples
Please refer to our Github repositories for more examples. The repositories with the postfix _workflow are the pipelines and the rest are the components.
Launch a pipeline
Essentially, you have two options to launch the pipelines generated by Kronos:
- (Recommended) use
runcommand to initialize and run in one step. - use
initcommand to initialize the pipeline first, then run the resulting Python script.
Note
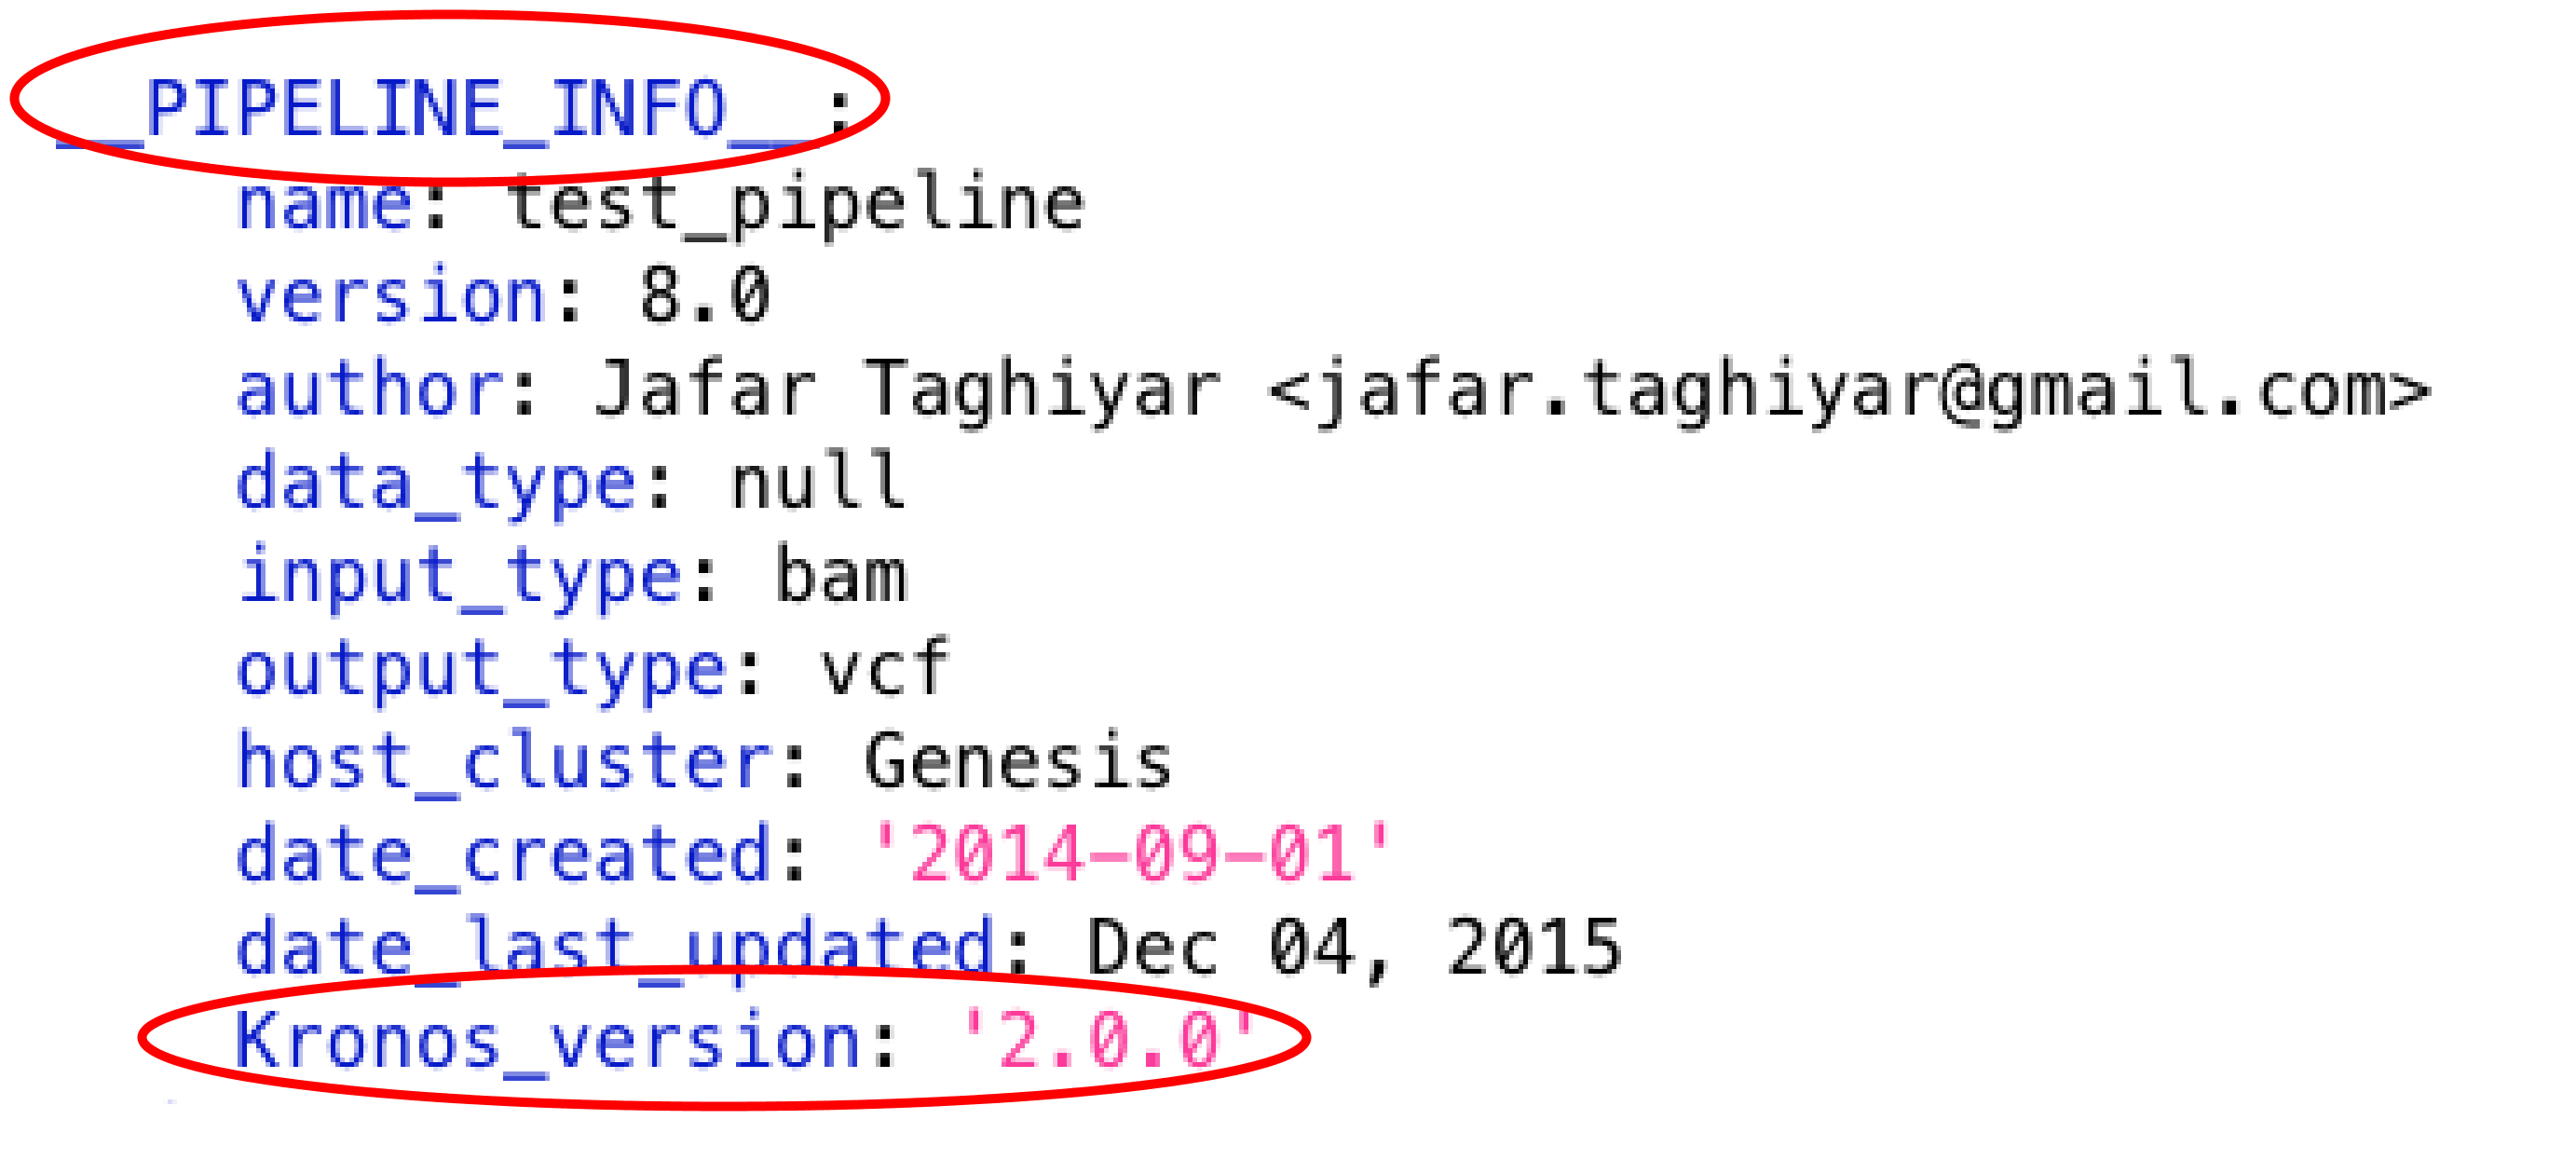
Make sure the version of the Kronos package installed on your machine is compatible with the version used to generate the configuration file which is shown at the top of the configuration file in __PIPELINE_INFO__ section:
1. Run the pipeline using run command
It is very easy to run a pipeline using run command:
kronos run -k </path/to/my_pipeline_script.py> -c </path/to/components_dir> [options]
Input options of run command
This is the list of all the input options you can use with run command:
| Option | Default | Description |
|---|---|---|
| -h or –help | False | print help - optional |
| -b or –job_scheduler | drmaa | job scheduler used to manage jobs on the cluster - optional |
| -c or –components_dir | None | path to components_dir- required |
| -d or –drmaa_library_path | lib/lx24-amd64/libdrmaa.so | path to drmaa_library - optional |
| -e or –pipeline_name | None | pipeline name - optional |
| -i or –input_samples | None | path to the input samples file - optional |
| -j or –num_jobs | 1 | maximum number of simultaneous jobs per pipeline - optional |
| -k or –kronos_pipeline | None | path to Kronos-made pipeline script- optional |
| -n or –num_pipelines | 1 | maximum number of simultaneous running pipelines - optional |
| -p or –python_installation | python | path to python executable - optional |
| -q or –qsub_options | None | native qsub specifications for the cluster in a single string - optional |
| -r or –run_id | None (current timestamp will be used) | pipeline run id - optional |
| -s or –setup_file | None | path to the setup file- optional |
| -w or –working_dir | current working directory | path to the working directory - optional |
| -y or –config_file | None | path to the config_file.yaml- optional |
| –no_prefix | False | switch off the prefix that is added to all the output files by Kronos - optional |
Note
“-c or –components_dir” is required to specify.
On --qsub-options option
There are a few keywords that can be used with --qsub_options option.
These keywords are replaced with corresponding values from the run subsection of each task when the job for that task is submitted:
mem: will be replaced withmemoryfrom run subsectionh_vmem: will be replaced with 1.2 *memory.num_cpus: will be replaced withnum_cpusfrom run subsection
For example:
--qsub_options " -pe ncpus {num_cpus} -l mem_free={mem} -l mem_token={mem} -l h_vmem={h_vmem} [other options]"
Note
If you specify --qsub_options option with hard values (i.e. not using these keywords), they will overwrite the values in the run subsection.
Initialize using run command
If you only have the configuration file and not the pipeline script, you can still use run command.
To do so, simply pass the configuration file using -y option.
This instructs Kronos to initialize the pipeline first and run the resulting pipeline script subsequently.
In this case, you do not have to specify -k option.
Tip
You can use -s and -i when you use -y to input sample file and setup file, respectively.
Warning
If you specify both -y and -k with run command, Kronos would use -y and ignores -k.
Note
When using run command, you cannot initialize only (i.e. without running the pipeline).
Use init command if you only want to make a pipeline script.
Run the tasks locally, on a cluster or in the cloud
When launching a pipeline, each task in the pipeline can individually be run locally or on a cluster. For this you need to use the use_cluster attribute for each task in the configuration file.
You can also launch the pipeline in the cloud. Please refer to the Deploy Kronos to the cloud for more information.
2. Run the pipeline using init command and the resulting pipeline script
You can launch a pipeline by using init command to create a pipeline script first:
kronos -w </path/to/working_dir> init -y </path/to/config_file.yaml> -e <name_for_pipeline>
and then by running the script.
The init command has the followig input options:
| Option | Default | Description |
|---|---|---|
| -h or –help | False | print help - optional |
| -e or –pipeline_name | None | pipeline name - required |
| -i or –input_samples | None | path to the input samples file - optional |
| -s or –setup_file | None | path to the setup file- optional |
| -y or –config_file | None | path to the config_file.yaml- required |
Samples file
It is a tab-delimited file that lists the content of SAMPLES section of the configuration file.
You can use the input option -i to pass this file when using init or run commands.
The content of the file should look like the following:
#sample_id  <key1>  <key2>  ...
<id1>       <value1>        <value2>        ...
<id2>       <value3>        <value4>        ...
where:
- the header always start with
#sample_idand the rest of it, the<key>‘s, are the keys used inkey:valuepairs. - the
<id>‘s should be unique ID’s, e.g. DAH498, Rx23D, etc. - the
<value>‘s are the corresponding values of the keys in the header.
For instance, the following is the content of an actual samples file:
#sample_id  bam     output
DG123       /genesis/extscratch/data/DG123.bam      DG123_analysis.vcf
DG456       /genesis/extscratch/data/DG456.bam      DG456_analysis.vcf
If this file is passed to the -i option, the resulting configuration file would have a SAMPLES section looking like this:
__SAMPLES__:
    DG123:
        output: 'DG123_analysis.vcf'
        bam: '/genesis/extscratch/data/DG123.bam'
    DG456:
        output: 'DG456_analysis.vcf'
        bam: '/genesis/extscratch/data/DG456.bam'
Info
Kronos uses the samples file to update (not to overwrite) SAMPLES section which means that if an ID in the setup file already exists in the SAMPLES section of the configuration file, the value of the ID is updated.
Otherwise, the new sample ID entry is added to the section and the rest of the section remains unchanged.
Setup file
It is a tab-delimited file that lists the key:value pairs that should go in GENERAL or SHARED sections of the configuration file.
You can use the input option -s to pass this file when using init or run commands.
The content of the file should look like the following:
#section    key    value
<section_name>    <key1>    <value1>
<section_name>    <key2>    <value2>
where:
- the header should always be:
#section key value(tab-delimited). <section_name>can be either__GENERAL__or__SHARED__.
For instance, the following is the content of an actual setup file:
#section    key     value
__GENERAL__ python  /genesis/extscratch/pipelines/apps/anaconda/bin/python
__GENERAL__ java    /genesis/extscratch/pipelines/apps/jdk1.7.0_06/bin/java
__SHARED__  reference       /genesis/extscratch/pipelines/reference/GRCh37-lite.fa
__SHARED__  ld_library_path ['/genesis/extscratch/pipelines/apps/anaconda/lib','/genesis/extscratch/pipelines/apps/anaconda/lib/lib']
If this file is passed to the -s option, the resulting configuration file would have GENERAL and SHARED sections looking like this:
__GENERAL__:
    python: '/genesis/extscratch/pipelines/apps/anaconda/bin/python'
    java: '/genesis/extscratch/pipelines/apps/jdk1.7.0_06/bin/java'
__SHARED__:
    ld_library_path: "['/genesis/extscratch/pipelines/apps/anaconda/lib','/genesis/extscratch/pipelines/apps/anaconda/lib/lib']"
    reference: '/genesis/extscratch/pipelines/reference/GRCh37-lite.fa'
Info
Kronos uses the setup file to update (not to overwrite) GENERAL and SHARED sections which means that if a key in the setup file already exists in the target section, the value of that key is updated.
Otherwise, the key:value pair is added to the target section and the rest of the pairs in the target section remain unchanged.
Run the pipeline script generated by init command
All the pipeline scripts generated by Kronos init command can also be run as following:
python <my_pipeline.py> -c </path/to/components_dir> [options]
where my_pipeline.py is the pipeline script you want to run.
Warning
It is required to pass the path of the components_dir to the input option -c when running the pipeline.
See What is the components directory? for more information on components_dir.
This is the list of all the input options you can use:
| Option | Default | Description |
|---|---|---|
| -h or –help | False | print help - optional |
| -b or –job_scheduler | drmaa | job scheduler used to manage jobs on the cluster - optional |
| -c or –components_dir | None | path to components_dir- required |
| -d or –drmaa_library_path | lib/lx24-amd64/libdrmaa.so | path to drmaa_library - optional |
| -e or –pipeline_name | None | pipeline name - optional |
| -j or –num_jobs | 1 | maximum number of simultaneous jobs per pipeline - optional |
| -l or –log_file | None | name of the log file - optional |
| -n or –num_pipelines | 1 | maximum number of simultaneous running pipelines - optional |
| -p or –python_installation | python | path to python executable - optional |
| -q or –qsub_options | None | native qsub specifications for the cluster in a single string - optional |
| -r or –run_id | None (current timestamp will be used) | pipeline run id - optional |
| -w or –working_dir | current working directory | path to the working directory - optional |
| –no_prefix | False | switch off the prefix that is added to all the output files by Kronos - optional |
What is the components directory?
It is the directory where you have cloned/stored all the components.
The generated pipeline has the input option -c or --components_dir that requires the path to that directory.
Note
Note that components_dir is always the parent directory that contains the component(s). For example, if you have a component called comp1 in the path ~/my_components/comp1, you should pass ~/my_components to the -c option:
Results generated by a pipeline
When a pipeline is run, a directory is made inside the working directory with its name being the run ID.
All the output files and directories are stored here, i.e. in <working_dir>/<run_ID>/.
What is the working directory?
It is a directory used by Kronos to store all the resulting files.
The user can specify the path to its desired working directory via input option -w.
Tip
If the directory does not exist, then it will be made.
Tip
If you do not specify the working directory, the current directory would be used instead.
What is the run ID?
Each time a pipeline is run, a unique ID is generated for that run unless it is specified using -r option by the user.
This ID is used for the following purposes:
- to trace back the run, i.e logs, results, etc.
- to enable re-running the same incomplete run, which it will automatically pick up from where it left off
- to avoid overwriting the results if the same working directory is used for all the runs
Info
The ID generated by Kronos (if -r not specified) is a timestamp: ‘year-month-day_hour-minute-second’.
What is the structure of the results directory generated by a pipeline?
The following tree shows the general structure of the <working_dir>/<run_ID>/ directory where the results are stored:
<working_dir>
|-- <run_id>
|   |-- <sample_id1>_<pipeline_name>
|   |   |-- logs
|   |   |-- outputs
|   |   |-- scripts
|   |   |-- sentinels
|   |-- <sample_id2>_<pipeline_name>
|   |   |-- logs
|   |   |-- outputs
|   |   |-- scripts
|   |   |-- sentinels
|   |-- <pipeline_name>_<run_id>.yaml
|   |-- <pipeline_name>_<run_id>.log
where:
an individual subdirectory is made with name
<sample_id>_<pipeline_name>for each sample in the SAMPLES section.- there are always the following four subdirectories in the
<sample_id>_<pipeline_name>directory: logs: where all the log files are storedoutputs: where all the resulting files are storedscripts: where all the scripts used to run the components are storedsentinels: where all the sentinel files are stored
- there are always the following four subdirectories in the
If there is not any samples in the SAMPLES section, then a subdirectory with name __shared__only___<pipeline_name> is made instead of <sample_id>_<pipeline_name>.
In fact, since there are no ID’s in the SAMPLES section, Kronos uses the string __shared__only__ to idicate that SAMPLES section is empty.
Note
The developer of the pipeline can customize the content of the outputs directory (see Output directory customization for more information).
So, you might see more directories inside that directory.
Info
scripts direcotry is used by Kronos to store and manage the scripts and should not be modified.
Info
Sentinel files mark the successful completion of a task in the pipeline.
sentinels directory is simply used for stoing these files.
How can I relaunch a pipeline?
If you have run a pipeline and it has stopped at some point for any reason, e.g. a breakpoint or an error, you can re-run it from where it left off.
For that purpose, simply use the exact same command you used in the first place but only make sure that you also pass the run ID of the first run to the input option -r.
Note
If you forget to pass the run ID or pass a nonexistent run ID by mistake, Kronos considers that as a new run and launches the pipeline from scratch.
This will not overwrite your previous results.
Tip
If you want to relaunch a pipeline from an arbitrary task (that already has a sentinel file), you need to go to the sentinels directory and delete the sentinel file corresponding to that task.
Then relaunch the pipeline as mentioned above.
Remember that all the next tasks that have connections to this task will also be re-run regardless of whether or not they have a sentinel file.
The reason for this is that Kronos checks the timestamp of the sentinels and if the sentinels of the next task are outdated compared to the current task, it will re-run them too.
Tip
If you want to run a part of a pipeline between two tasks (two breakpoints) for several times, each time you need to delete the sentinel files of the tasks between the two breakpoints as well as the sentinel file of the second breakpoint. In the new version, we’re working on making this easier by eliminatig the need to delete these sentinels each time.
Tip
A sentinel file name looks like TASK_i__sentinel_file.
For the breakpoints, the sentinel file name looks like __BREAK_POINT_TASK_i__sentinel_file.